Getting OAuth 2.0 client ID and secret for Entra ID
This topic explains how to obtain OAuth 2.0 client ID and secret for the Sage CRM features that need to authenticate against Microsoft Entra ID to access an Exchange Online account or a mailbox in Outlook web app.
Before you begin
If you want to obtain OAuth 2.0 client ID and secret to access a mailbox in Outlook web app, complete these additional steps first.
- Sign in to Outlook web app.
Use the account that owns the mailbox for which you are configuring OAuth 2.0.
The account must have administrator privileges in Outlook. -
In Outlook settings, go to POP and IMAP and make sure that Let devices and apps use POP is set to Yes.
-
If necessary, save your changes.
Steps to obtain OAuth 2.0 client ID and secret
- Sign in to the Microsoft Entra admin center as an administrator.
- Go to App registrations.
- Register a new application:
- Select New registration:
- Enter a descriptive name for the application.
- Under Supported account types, select Accounts in any organizational directory (Any Microsoft Entra ID tenant - Multitenant).
Sage CRM does not support other options under Supported account types.
- Under Redirect URI (optional), select Web and enter the following URIs:Copy
https://{server name}/{install name}/custompages/oauth/callback.htmlIf your Sage CRM server is accessible on the internet, also add:
Copyhttps://{server FQDN}/{install name}/custompages/oauth/callback.htmlIn these URIs:
{install name} is the name of your Sage CRM installation. It must be all lowercase.
{server name} is the name of the Sage CRM server. It must be all lowercase.
{server FQDN} is the fully qualified domain name of the Sage CRM server. It must be all lowercase.
- Click Register.
- Copy the application (client) ID and store it in a file.
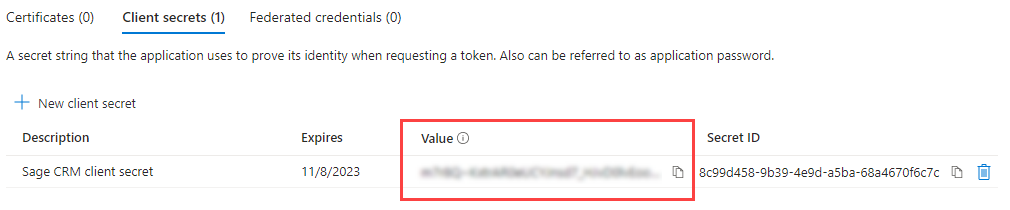
- Obtain a secret for your application:
- Go to Certificates & secrets.
- Click New client secret, type a description and select an expiry option.
- Click Add.
- In the Value column, copy the client secret value and store it in a file:
-
Go to API permissions and add the Microsoft Graph delegated permissions required for the Sage CRM feature you want to use:
Sage CRM feature
Required Microsoft Graph permissions
-
Standard email
-
Email Management
-
IMAP.AccessAsUser.All
-
POP.AccessAsUser.all
-
SMTP.Send
Import of contacts and email messages
-
Contacts.Read
-
Contacts.Read.Shared
-
IMAP.AccessAsUser.All
-
Mail.Read
-
Mail.Read.Shared
-
Mail.ReadWrite
-
Mail.ReadWrite.Shared
-
POP.AccessAsUser.All
-
SMTP.Send
-
Enter the obtained client ID and secret in Sage CRM. For details, see: