Creating an organization chart
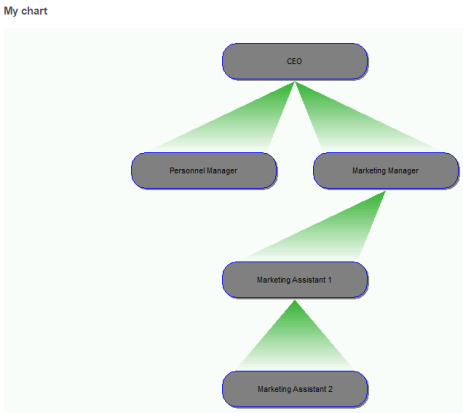
This topic illustrates how to create an organization chart. You can display an organization chart on a new custom tab for each entity record you want. Below is an example organization chart:

The following example shows how to display this chart on a new tab for each Company:
- Create a custom ASP file that contains the following code:Copy
<!-- #include file ="sagecrm.js" -->
<html>
<body>
<%

// Get the orgchart block and store it in the org variable.
var org;
org=CRM.GetBlock('orgchart');

// Add the chart title. If you omit the Title parameter, no title is added.
org.OrgTree("Title","My chart");

// Optionally, specify an icon for the top-level box in the chart.
// org.OrgTree("EntityIcon","C:\\FileName.bmp");

// Optionally, specify a custom background for each box in the chart.
// org.OrgTree("EntityImage","C:\\FileName.bmp");

// Add the top level of the chart (CEO).
org.OrgTree("Add",",CEO,false,");

// Add Marketing Manager.
org.OrgTree("Add","CEO,Marketing Manager,true,");

// Add Personnel Manager.
org.OrgTree("Add","CEO,Personnel Manager,true,");

// Add Marketing Assistant 1 and Marketing Assistant 2.
org.OrgTree("Add","Marketing Manager,Marketing Assistant 1,true,");
org.OrgTree("Add","Marketing Assistant 1, Marketing Assistant 2,true,");

// Define the style of connectors in the chart. You can use Arrow, Ray, or Line.
org.OrgTree("LineStyle","Ray");

// Define the style of boxes in the chart. You can use Square or Round.
org.OrgTree("BoxStyle","Round");

// Optionally, define the overall chart height. To use the default height, omit this line.
// org.OrgTree("FullBoxHeight","150");

// Optionally, define the overall chart width. To use the default width, omit this line.
// org.OrgTree("FullBoxWidth","250");

// Optionally, define the height of each box in the chart. To use the default height, omit this line.
// org.OrgTree("BoxHeight","50");

// Optionally, define the width of each box in the chart. To use the default width, omit this line.
// org.OrgTree("BoxWidth","100");

// Specify if you want to use animation to display the chart.
// org.OrgTree("Animation","True");

// Specify if you want to display chart legend.
org.OrgTree("ShowLegend","False");

// Show your chart on the screen.
CRM.AddContent(org.Execute());
Response.Write(CRM.GetPage());

%>
</body>
</html> - Save the ASP file in the CustomPages folder in the Sage CRM installation directory.
The default location of the CustomPages folder is %ProgramFiles(x86)%\Sage\CRM\CRM\WWWRoot\CustomPages. - Create a new tab and link it to your ASP file:
- Log on to Sage CRM as a system administrator.
- Go to <My Profile> | Administration | Customization.
- Click Company, and then click Tabs.
- In the Tab Group Name column, click Company.
- Under Properties, use the following options:
- Caption. Enter the new tab name.
- Action. Select customfile.
- Custom File. Enter the name of the custom ASP file you created in step 1 of this procedure.
- Click Update, and then click Save.
You can view the created organization chart on the new tab you created for each Company record.
